Pages

Monday, May 7, 2012

I Do, Take Two - The Invitation

From the beginning I knew I wanted a somewhat rustic/vintage feel for our Vow Renewal. I had seem some ideas online and came up with my own twist to the Vow Renewal...I Do, Take Two. Since this was a 2nd chance for us I wanted everything to be perfect. Starting with the invite. I first created the invite and then saw the idea to make an envelope from a doily and I knew I wanted to attempt that. Especially since my dress was all lace, using doilies for the envelope and decorations help tie it all together.

I used a 10.5x 10.5 white doily. I felt like the doily was too fragile by itself so I folded a piece of cardstock in half and then used modpodge to glue the 3 sides to the cardstock. I punched a 1/2 circle in the side where the invite would go and then sealed them with a sticker.


The "lace" envelope

I hand delieved my envelopes to my guests. Not sure the doily would hold up in the mail.
Putting them inside a clear envelope would be cute.


The front of the invite

And the back of the invite.
I used a picture from our original wedding to the back of the card along with a Bible verse.

I just love how the invite and envelop turned out and it helped set the theme for the renewal.


Saturday, August 6, 2011

Playhouse Construction - Day 10

The playhouse is looking great! The original plan was to put pickets along the front porch but then decided to go with a solid sheet of plywood and cut out a design. So Lance drew it and cut out the front panel design with a jigsaw. Took him about 6 hours to cut the entire scene out. We attached the scene to the front and I started to prime the house. I used Zinner Oil based primer over the entire house. I went with an oil based since it would be outside and I wanted it to be protected as much as possible. However, Eve and I went out there one night after work and I let her paint with the primer...she had oil based paint ALL OVER HER...head to toe. At one point I saw her stick her hand in the can of paint. Oh my! But she had a great time! I scrubbed her down afterwards with some mineral spirits and got most of it off but she still had it on parts of her arms and legs and some specs in her hair for at least a week. :) I wish I would have taken a picture!

Here is the front design panel with one coat of primer.

The idea behind it was the Royal Coat of Arms pictured below.


The design was Lance's idea but I ended up painting it much more girly than the picture above.

You can see the stair design in post Day 8 & 9. Once that design was set we went with the same look for all the trim work. On Day 10 my parents were back for a visit (late June 2011) and helped complete the rest of the trim work. 


Also, on this visit my awesome Dad sheet-rocked and puttied the entire inside of the playhouse!!


Here is the dutch door from inside looking out. We still need to get a proper knob for the doors. Right now we are just using a chain with a hook.

Next post will be the finished paint job! Stay tuned!


Saturday, July 30, 2011

Playhouse Construction - Day 8 & 9

Playhouse construction days 8 and 9 were when things really starting to progress and it was really starting to look like a house.

To view my previous playhouse posts visit Day 1 & 2 and Days 3 - 7

My parents came back about 6 weeks after day 3 of construction. The plan was to get the windows in, the slide on and some of the trim work...which we accomplished all of that and more.


The stairs were challenging. My Dad wasn't exactly sure how we were going to do do them. Our original design had the stairs coming down off the front porch and turning towards the side. But then we thought it could be a safety issue to have an opening along the front face of the porch. So we put them off to the side. The stairs had to be wide enough and deep enough but not too deep for little feet to run up and down them. So as my Daddy says...what starts out as a mistake, actually turns into something really cool and people think you meant to do it like that.

Yes, I know...these stairs look really funny at the moment.
Reminds me of an escalator or something.


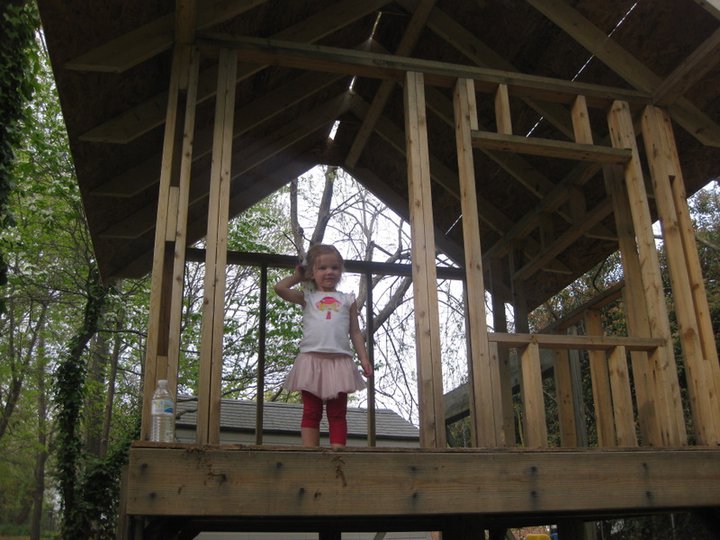
We had Eve test out the stairs to be sure they were going to work.


 This picture makes me laugh...she is such a ham. She loves showing off her new house.
As you can see, the windows are all in.

So we drew a design on for the stairs and my Dad cut it out.  


Pretty cool, huh!


So to me...it looks like waves, but Lance's thought was to make it look like flames...
what do you see?


None the less, we really liked the wavy look. Our original plan was to put sliding on this playhouse. I had hauled some from down the street in my neighborhood from a house that was replacing theirs. It was not in too bad of shape...not for a playhouse anyway so I drug that awful stuff down the road and it was stored in our garage for almost a year. But as I mentioned, we really liked the wavy look, so we decided to trash the sliding and just use the particle board that was on the house and cut the trim to also be wavy.

You can see the wavy trim design below around the door and sides of the house.

Again, our original design plan kept changing as this house evolves but our thought was to make the front porch have pickets just like a regular porch does. My Dad had even cut all the pickets to size and brought them to us. But then he suggested perhaps using plywood to cut a design into and make that be the porch railings. So that is what the big sheet of plywood is up for.

And here's a close up of the newly designed stairs with the hand rail.


End of Playhouse Construction - Day 9


Side view of the house with some of the trim on.


 Our plan was to have the house somewhat usable for Eve's 3rd Birthday party which was a few weeks away. And it definitely was...she wants to play in it all the time and it's not even done. The kids at her party thought it was coolest thing ever!

More to come...stay tuned!


Playhouse Construction - Day 3 - Day 7

Playhouse construction was moving kinda slow mainly b/c my Daddy is a BIG part of getting it built and my parents live almost 3 hours away so building can only be done when they come to visit and the weather is cooperating.

To see the Playhouse from the very beginning, please visit Playhouse Construction - Day 1 & 2

The playhouse stayed looking like the picture below for the rest of the summer through the winter months.

But then in April 2011, construction started back and with Eve turning 3 in a couple months she was old enough to really start to enjoy and understand this new project.

Day 3 of construction was to get the rafters built and the roof on the house.


And here is the little princess herself.
She started calling it her castle and that Papa was building her a pink castle.

In between Day 3 & Day 8 when my parents came back, our job was to in close the house and get the shingles on the roof. The picture below is the backside of the house with most of the boards attached.


We recruited some friends to help us finish the side boards and shingles. Our friend had a bunch of shingles that had never been used, so we got to use them and he actually put them all on for us.


The shingles did take about 3 different visits for him to finish...
he's kinda a slow worker but hey...I'm not complaining!


At the end of Construction Day 7, the walls are on & roof is done!

More to come...stay tuned!


Playhouse Construction - Day 1 & 2

I have always loved the idea of a playhouse or tree house. When I was a little girl my Daddy built my sister and I a small playhouse which he then turned into his first wood shop but then we moved and in the next house I had an open tree house of sorts. I can remember talking about building a playhouse for Eve when she was less than a year old. At first we thought we would construct it in the garage and then just move it when our house sold. But of course she was still too young to actually play in it yet. So when our house sold in February 2010 Eve was about 20 months old and the house we bought already had a platform in the back yard that we were told once was some sort of playhouse or fort for the kids who lived there many years ago. So we decided to use that as our base and build upon that. We started construction in August 2010.

BEFORE - this is the platform that was already there

We removed these stairs and added some extra support beams underneath

I have always loved dutch doors so we went to the local Habitat Restore and found this solid wood door for $50. The idea is to cut it down and in half to make a dutch door.

We also picked up these windows at Habitat Restore. The smaller ones were $3 a piece and the longer rectangle was $10.

Day 1 of construction...the 1st wall is going up...

End of Day two...all the walls are framed out

The dimensions of the house are 8x10 with a 2 foot porch.
Once the rafters are up, we are thinking it will peak at 9 or 9.5 feet.


Stay tuned for more to come with this awesome little project...

Thursday, May 5, 2011

Playroom Makeover

When we were house hunting at the beginning of 2010 one of my requirements was that the house had to have a room for a playroom. In our last house we had toys in lots of different rooms...the living room, the office, Eve's bedroom, etc. I wanted one place for everything. And I wanted the room somewhat close to where we spend out time because she is still very young.
So we ended up buying this house and there is a 'dining room' kinda in between the living room and kitchen. We hardly ever used the dining room in our last house so we decided to make that our playroom.

Here is a before shot of what it looked like when we went house shopping with the other people's stuff in the room.


Once we moved in, I tried to organize it the best I could. We put some book cases in there, a tv cabinet, hung her art on the walls, etc. But I still didn't like the color. The top was a green sponge paint and the bottom a sage-y green. It didn't flow with the rest of my house.

Here are some pictures of the room just after we moved in.


But then it turned to this...


I'm not proud...


I was about to loose it. Eve is 2 1/2 years old and knows how to clean up and put toys away at school...there's no reason why she can't do it at home. I think part of the problem is at school there is a place for everything with labels and pictures. In this room she has no idea where to put anything.

So a trip to my favorite...IKEA...was in store. I was on a mission to buy some storage organization something. And I came home with this.


I organized all her things and laminated labels to put on her bins.


The labels are actual pictures of her toys that I found online.


This use to be a floor easel from IKEA but it took up so much room in the corner that I cut the legs off one side and hung it on my wall. The chalk board is behind the paper. You just pull the paper up or off when you want to use it.


And here she is in her favorite spot to watch her princess movies!


Oh, and I did paint the walls...the top matches our living room...kinda a blue-ish/gray and the bottom a tan color.  Still have to make a curtain for the room but it's pretty much done now. Ahh...prettier and more organized!