Pages

Sunday, December 26, 2010

My DIY Christmas

Christmas 2010 has been a very DIY kind of Christmas. I had bought several things to turn into projects and thought...why not give them as gifts. I actually did not photo all of my gifts I made...I forgot. :(

American Girl Doll Kitchen
I converted this old cabinet into a kitchen for Eve's American Girl Doll.
BEFORE picture

I primed it with 2 coats then 3 coats of left over pink semi-gloss paint from Eve's room. Made one of the drawers into a microwave by removing the backside of the drawer, made a hole for the sink (dog bowl) and curved a copper pipe for the faucet. I brought some small kitchen items from the Our Generation brand at Target to go with it.

AFTER picture

stove top are small black circles and a sink and faucet


Doll Cradle

I posted this eariler but here it is again.

BEFORE picture


I painted it and made a bed to go with it.

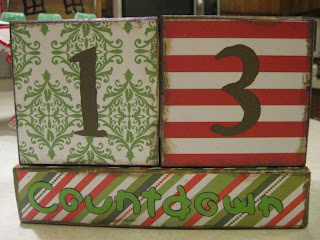
Countdown Blocks
I made several sets of these but didn't take pictures of all of them. But here are a couple I made as Christmas gifts.


Holiday Blocks

These were fun to make and so easy. They are just 2x4's cut at different lengths and then used Modge Podge to add scrapbook paper and hand drew the letters on them.


Halloween Blocks...would look cute on the mantel at Halloween

Be Mine blocks for Valentine's Day


Purple Black and Decker Kid Workbench

Eve kept saying she wanted some "pink" tools. She watches me use tools alot and wanted her own. Well I looked everywhere for some pink tools. They make them for adults but not kids. So...we decided to buy a black and decker workbench with tools and just spray paint them. :) I couldn't find pink plastic spray paint but did find purple so that would have to do.
I used Krylon Fusion Purple Spray Paint that can be sprayed on plastic. Worked pretty good.


Reindeer Rootbeer

I got this idea at Crafty Sisters. I thought it would be so cute to make for Eve's teachers. I am not a Root Beer fan myself but hoped maybe they were. :)


Polymer Clay Play Food
Eve was looking threw her American Girl catalog and said she wanted some cupcakes for her dolls. (This was before I bought the Our Generation kitchen food). So I busted out the polymer clay and we made a few pieces. When we were done she clapped her hands and said "Yay...you made it....great job Mommy, great job!!" It was so cute! (she's only 2 years old)


In addition to these crafts I made some homemade cards and grouped them together in packs of 10 as gifts. I made my mom and mother-in-law a Chair Planter like mine but forgot to take pictures of them.
I have felt like Santa's elf this year. :)

Merry Christmas!


Monday, December 20, 2010

Doll Cradle - Before & After

My neice Lucy enjoys playing with Eve's doll cradle when she comes to visit. My sister-in-law mention getting her a wooden one for Christmas so when I came across this I called her to see if she'd found one. Found it for $15 at The Gingham Daisy.


I brought it home and put a coat of primer on it. Then used left over pink and green paint from Eve's room. I also had left over foam and fabric to make a mattress, cover and pillow. And viola...it's done!


American Girl Kitchen

Eve really likes playing with her kitchen and her dolls. She got an American Girl catalog a couple weeks ago and in there is a pictures of a kitchen table and food accessories for the Americal Girl dolls. She saw it and called it a kitchen and asked if I could make her one. (She's been watching me make larger play kitchens). I thought...of course...a DIY Doll Kitchen. I looked online and saw the Our Generation girls from Target have a kitchen but other than that...small kitchens that are not Barbie size are hard to find. So I was on the hunt for a piece of furniture I could repurpose to a doll kitchen. I went to my favorite consignment shop...The Gingham Daisy and it wasn't long before I spotted this find! I love the mission style look.

American Girl Doll Kitchen - BEFORE

I actually paid about $23 which is more than I usually would spend but it was just too perfect. It would fit her American Girl doll great! I got my Dad to cut off the bottom of the shelf and drilled a hole for the sink. I picked up a small dog bowl for the sink. This project is still a work in progress but hope to be done soon. I added small marble type pieces I've had for years and glued them to the backsplash.


I'll post more pictures once I get further along. This is such a fun project!


Friday, December 3, 2010

Painted Tree

We moved into this house in Feb 2010. Eve was only 20 months at the time and was still in her crib. I did not plan on moving her into a big girl bed at such a young age but as soon as we moved she started to climb/fall out of her crib in the middle of the night. So we decided to try out the big girl bed (which was mine that my Dad made me when I was 7 or so). Turns out she loved it and slept so good. So I got her some new bedding and found this Circo Love and Nature theme at Target and thought it was perfect for a little girl's room. The theme was trees, owl, mushrooms etc so I knew I wanted to put a tree on her wall. My husband is somewhat of an artist himself so he drew the tree and I painted it. The flowers and animals are wall decals that was part Love and Nature theme.

BEFORE picture...just boring green walls


The AFTER - hand drawn / painted tree


And most of importantly...Eve LOVES her tree!


Linking to:
Photobucket


Chair Planter

Here was another Repurposed project I found from other blogs online. I got this chair for $5 at my favorite consignment shop...The Gingham Daisy. I cut the seat out and primed it, then spray painted it a shade of blue-ish/purple. Then went back over it lightly with some sand paper to give it a worn look then sprayed some clear coat over the entire chair. I added a coconut liner to the seat, added my plant and put it right by the front door!

Chair Planter - BEFORE

The Chair Planter - AFTER


That's my sweet Maggie by the front door.


Headboard Bench

This is another idea I got from some of the fabulous sites I visit. Gail at My Repurposed Life has some great ones! My husband called me on his way home from work one day to let me know there was a big pile of stuff out by someone's crub up the road. As soon as he got home I jumped in my car and headed up there. I was so excited when I got out to find that under that pile of junk was an old headboard/footboard. FINALLY! I had been looking for cheap ones at consignment shops but all were too expensive and this one was FREE! With the head and footboard was the sideboards. I wasn't sure if I would need them but I grabbed them up anyway. Turns out I did use them. We cut them into planks and turned it into the seat.

Old Headboard / Footboard BEFORE picture


The AFTER - Finished DIY Headboard Bench


The entire project costs me ZERO dollars. The bed was free and I used left over paint from our Front Door. Found a good spot in the front yard. Love how it turned out!!

Linking to: 
Photobucket


DIY Play Kitchen

My cousin actually told me about this idea of converting old pieces of furniture into a play kitchen for kids. As soon as I heard about it I knew this had my name all over it. I LOVE making things for Eve (my 2 year old). She already has a wooden kitchen we bought her for her 1st birthday but we are building a playhouse outside and so I thought a handmade DIY play kitchen would be perfect for that.

I found this old nightstand at a flea market for about $12.

DIY Play Kitchen - Before - Old Nightstand
I put 2 coats of primer on there and then use a couple cans of apple green spray paint. Took the bottom drawer out and cut the top drawer in half. These 2 pieces would make a great microwave and oven door. Cut a hole in the top for the sink (dog bowl). Cut 4 small circles of wood for the stove burners. Used the knobs from the drawer for the stove knobs and 2 others I just had on hand. The fabric for the skirt was leftover fabric I used in my real kitchen. I found the faucet from the Habitat Restore for $4 and the board that is behind the sink. Attached a small rod from IKEA to hang the pots on and it's a wrap. A new kitchen for my niece and nephew for Christmas. (Eve's is coming...had to experiment with my 1st one) :)

 The After - DIY Play Kitchen


 I used chalk board paint on one side.
I've got 2 more I'm working on and will post those when they are done.

Linking to:
Photobucket